How To: Use Baselines
One tool to assist measuring how a schedule has changed over time is to create a baseline. A baseline is a snapshot of a schedule taken at a point in time: in the future you can compare the current state of your schedule to this snapshot to help understand what has changed.
Baselines
Microsoft Project
Microsoft Project captures a baseline by taking copies of a small set of attributes for tasks, resources and resource assignments. The main attributes captured for each of these entities are Work, Cost, Duration, Start and Finish. These attributes can be stored as one of 11 distinct baselines: one called simply "Baseline", and the rest labelled "Baseline 1" through to "Baseline 10". If we pick Duration as an example attribute, the baseline value for this attribute might appear as "Baseline Duration", "Baseline 1 Duration", "Baseline 2 Duration" and so on, depending on which set of baseline attributes you had chosen to capture your snapshot.
Capturing a baseline in Microsoft Project is as simple as selecting the "Set Baseline" menu option for the current project you are working with to take a new baseline.
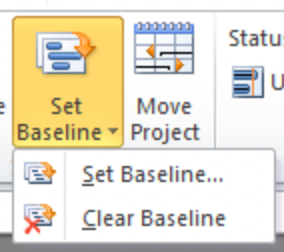
You'll be prompted to select which baseline you'd like to populate ("Baseline", "Baseline 1", "Baseline 2" and so on), and whether you'd like to baseline the whole project or just selected tasks.
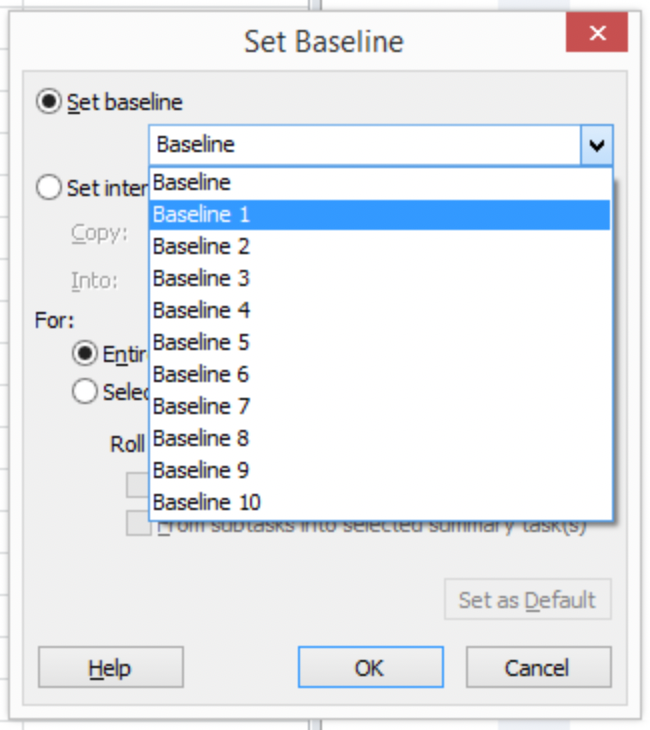
When you click OK, the attributes captured for a baseline by Microsoft Project will be copied to the equivalent baseline attributes.
Note that the baseline attributes you have captured as part of this process have no special properties: they can be edited once they have been captured, and no recalculation takes place if they are edited (for example, if you change a baseline duration of a task, the baseline finish date of the task won't change).
Primavera P6
The approach taken by Microsoft Project to managing baselines is unusual: most other scheduling applications take an approach similar to that used by Primavera P6, which is to take a complete copy of the schedule at the point a baseline is made, and thus any part of the baseline schedule is available in future to be compared with the current schedule. Let's look at baselines in P6 in a little more detail.
Baselines are managed in P6 in two stages. The first stage is actually to capture a baseline, which is achieved by selecting the "Maintain Baselines..." menu option.
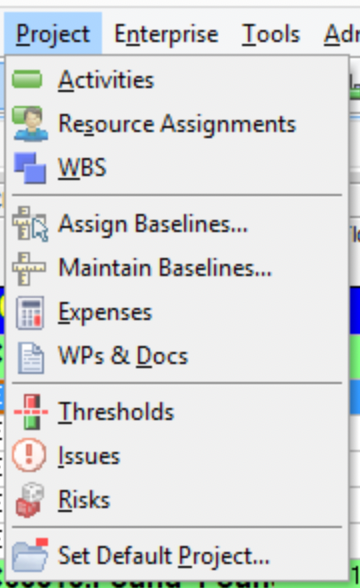
The dialog which opens allows you to create, update, or delete a baseline.
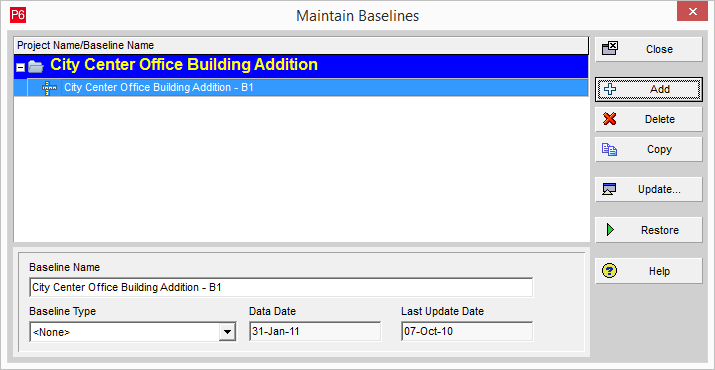
When a baseline is taken, although it is simply a copy of an existing project, the baseline itself is not visible as a normal project in P6 so you can't view or, and more importantly for us, export it. The Maintain Baselines dialog includes the option of "restoring" a baseline, which turns the baseline back into a normal project which you can view or export.
Once you have a baseline, you then need to "assign" it in order to tell P6 what you want to do with it by selecting the "Assign Baselines..." menu option we saw earlier. This menu option will open a dialog similar to the one shown below.
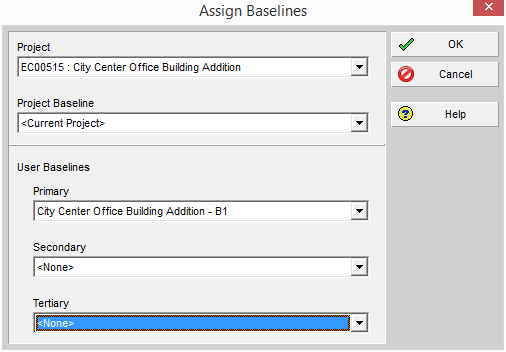
As you can see from the dialog, P6 recognizes four distinct baseline types: the Project Baseline, and the Primary, Secondary and Tertiary User Baselines.
Note that the User Baselines are not visible outside of P6, i.e. information about which baselines are assigned as user baselines does not appear in either PMXML or XER files exported from P6.
In a similar way to Microsoft Project, P6 allows attributes from these baselines to be shown alongside information from the current schedule.
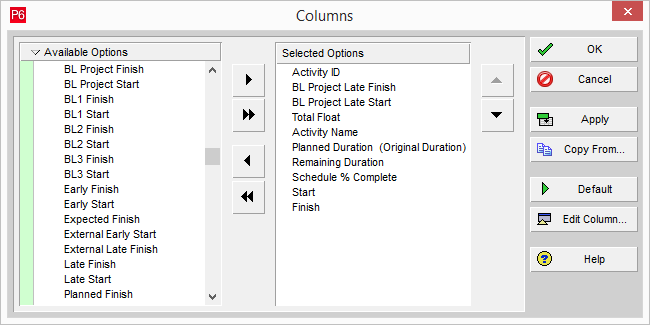
The dialog shown above is being used to select the columns to display in the tabular part of the Gantt chart in P6. As you can see there four start and finish attributes shown here, corresponding to the Project Baseline (for example BL Project Start) and the User Baselines (for example, BL1 Start, BL2 Start and BL3 Start).
There is a "special case" baseline, and a slightly obscure setting in P6 which determines exactly which values are shown in these columns. The "special case" baseline is where "<Current Project>" is selected as the baseline. This value doesn't represent a baseline which has been taken from the current project, but instead tells P6 that it should display the "planned" attributes from the current schedule in any baseline columns the user adds to the Gantt chart. So for example, if "<Current Project>" has been selected as the Project Baseline, then the values in the "BL Project Start" column on the Gantt chart will be the same as the values in the "Planned Start" column.
Where an actual baseline taken from the project has been assigned, then the values which will be shown in the baseline columns will depend on the "Earned Value Calculation" setting from the P6 Admin Preference dialog.
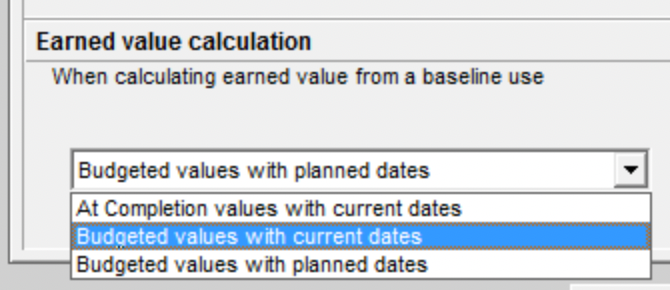
If the "Earned value calculation" setting is "Budgeted values with planned dates", then the Planned dates from the selected baseline schedule are used to populate the baseline attributes in the current schedule (for example, BL Project Start in the current schedule will be populated by the Planned Start value from the baseline schedule). If the "Earned value calculation" setting is NOT "Budgeted values with planned dates", then the current dates from the selected baseline schedule are used to populate the baseline attributes (for example, BL Project Start in the current schedule will be populated by the Start value from the baseline schedule).
It's important to note that the "Earned Value Calculation" setting is NOT available in either PMXML or XER files exported from P6, so when presenting schedule data from these files types to an end user outside of P6, there is no way to automatically determine which are the correct baseline values to be displayed.
Asta Powerproject
Powerproject takes the same approach as P6 to capturing a baseline - an entire copy of the schedule is made. This copy can either be held as a separate file, or can be embedded within the main schedule file (note the "Embed the baseline in the file" option in the dialog shown below).
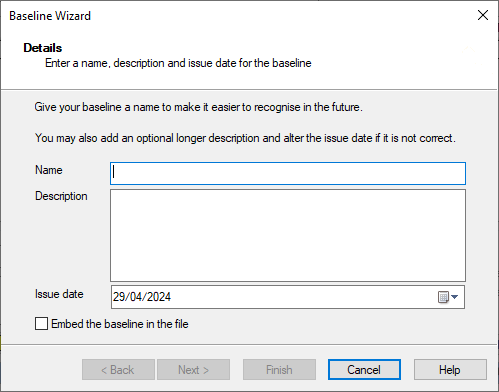
MPXJ can read baselines which have been embedded within the main schedule file, although as you will see in a later section, with a little more work you can attach a baseline from a separate file to the main schedule.
MPXJ
Microsoft Project
Using MPXJ to work with baseline data from an MPP or MSPDI file is straightforward as any baseline values are available directly from the task, resource and resource assignment classes. The example below illustrates this by retrieving the Start attribute of a task, and some of the Baseline Start attributes.
ProjectFile file = new UniversalProjectReader().read("sample.mpp");
Task task = file.getTaskByID(Integer.valueOf(1));

System.out.println("Start: " + task.getStart());
System.out.println("Baseline Start: " + task.getBaselineStart());
System.out.println("Baseline 1 Start: " + task.getBaselineStart(1));
System.out.println("Baseline 2 Start: " + task.getBaselineStart(2));

// ...

System.out.println("Baseline 10 Start: " + task.getBaselineStart(10));
When a baseline is taken in Microsoft Project, the date on which the baseline was taken is recorded. This can be used to indicate which baselines are set, and when they were set, although this data is only available from MPP file, not MSPDI files. The example code below illustrates how baseline dates can be used:
ProjectFile file = new UniversalProjectReader().read("sample.mpp");
ProjectProperties props = file.getProjectProperties();

for (int baselineNumber=0; baselineNumber <= 10; baselineNumber++)
{
   LocalDateTime baselineDate;
   String baselineLabel;

   if (baselineNumber == 0)
   {
      baselineDate = props.getBaselineDate();
      baselineLabel = "Baseline";
   }
   else
   {
      baselineDate = props.getBaselineDate(baselineNumber);
      baselineLabel = "Baseline " + baselineNumber;
   }

   if (baselineDate == null)
   {
      System.out.println(baselineLabel + " not set");
   }
   else
   {
      System.out.println(baselineLabel + " set on " + baselineDate);
   }
}
Primavera P6
Getting baseline data for a P6 schedule is slightly more complex than for a Microsoft Project schedule.
The first thing to note is that XER files do not contain baseline data. XER
files do include the ID of the Project Baseline schedule (via the
ProjectProperties.getBaselineProjectUniqueID() method) but nothing more. Note
that if the Project Baseline ID value is zero, this indicates that the Project
Baseline selected in P6 is "<Current Project>". If this is the case, MPXJ
will populate the attributes for the default baseline from the planned
attributes (for example a task's Baseline Start will be set to the task's
Planned Start attribute). This matches the behavior of P6 when "<Current
Project>" is selected as the Project Baseline, and it the only time any form
of baseline data will be available when reading an XER file.
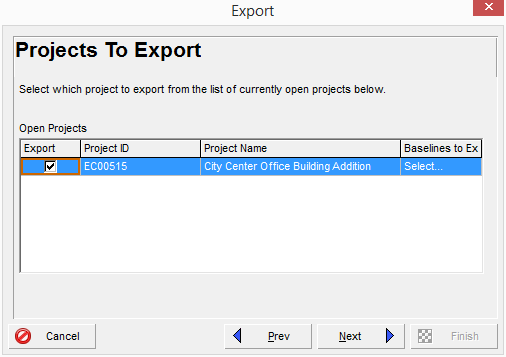
The easiest way to get baseline data other than "<Current Project>" for a P6 schedule is to export a PMXML file. As part of the export process, the export dialog shows a column allowing baselines to be selected for export:
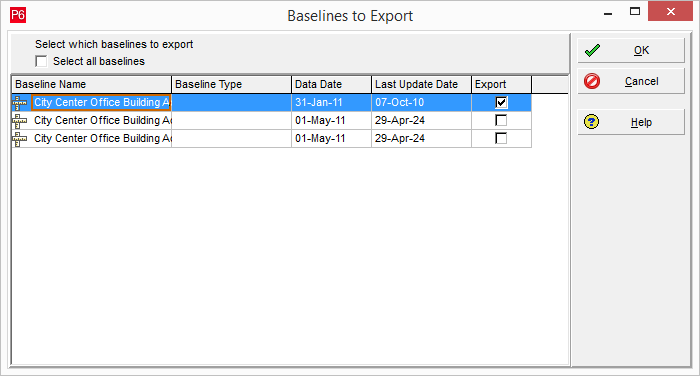
This opens a dialog for you to make the selection. Note that multiple baselines may be selected for export:
When a PMXML file is read all of the projects exported including any baselines
will be available as ProjectFile instances from the readAll method.
List<ProjectFile> projects = new UniversalProjectReader().readAll("sample-pmxml.xml");
System.out.println("The file contains " + projects.size() + " projects");
Alongside providing access to the current schedules and any baselines in the
file, MPXJ will also apply the same "<Current Project>" logic to PMXML
files as to XER files: so if the
ProjectProperties.getBaselineProjectUniqueID()
method returns zero, MPXJ will automatically populate the attributes of the
default baseline using values from the equivalent planned attributes (for example
a task's Baseline Start will be set to the task's Planned Start attribute).
Where PMXML files differ from XER files is that if the unique ID of one of the exported baselines matches the ID of the Project Baseline attribute from another project, MPXJ will link the two projects, populate the attributes of the default baseline in the main project using the equivalent planned attributes from the baseline project, and will set the default baseline date in the main project to the baseline project's create date.
To link the baseline MPXJ has actually attached the baseline ProjectFile
instance to the main schedule using the ProjectFile.setBaseline() method. As
well as begin able to work the populated baseline attributes in the main
schedule, you also have direct access to the baseline ProjectFile instance,
as illustrated by the sample code below:
ProjectFile project = new UniversalProjectReader().read("sample-pmxml.xml");
ProjectFile baseline = project.getBaseline();

System.out.println("Current project name: " + project.getProjectProperties().getName());
System.out.println("Baseline project name: " + baseline.getProjectProperties().getName());
MPXJ's default behavior when attaching a baseline to a project follows what P6
does when the the "Earned value calculation" configuration is set to "Budgeted
values with planned dates". As noted earlier this setting is not available in
XER or PMXML files, so there is currently no way to automatically select the
correct approach. You can however change MPXJ's default behavior by using the
ProjectFile.setBaselineStrategy() method. BaselineStrategy is an interface
implemented by classes which will implement the mechanism used to match
equivalent tasks from the main ProjectFile instance with tasks from a
baseline ProjectFile instance, and then populate the baseline attributes of
the tasks in the main schedule with attributes from the matching tasks in the
baseline schedule.
MPXJ provides baseline strategy implementations matching the two approaches
taken by P6, depending on the "Earned value calculation". The default strategy
is represented by the constant PrimaveraBaselineStrategy.PLANNED_ATTRIBUTES, with
the alternative approach represented by the constant
PrimaveraBaselineStrategy.CURRENT_ATTRIBUTES. The sample code below illustrates
how this constant is used to alter MPXJ's behavior to match P6 when the earned
value setting is not "Budgeted values with planned dates".
PrimaveraPMFileReader reader = new PrimaveraPMFileReader();
reader.setBaselineStrategy(PrimaveraBaselineStrategy.CURRENT_ATTRIBUTES);
ProjectFile file = reader.read("sample-pmxml.xml");
Asta Powerproject
When reading an Asta Powerproject schedule MPXJ will read the main schedule, and if defined and embedded in the main schedule file, the current baseline schedule. MPXJ will populate the attributes of the default baseline in the main project using the equivalent attributes from the baseline project, and will set the default baseline date in the main project to the baseline project's create date.
Note that at present MPXJ does not read all available baselines from a Powerproject schedule. Feedback welcomed if the ability to read all baselines is desirable.
ProjectFile project = new UniversalProjectReader().read("sample.pp");
ProjectFile baseline = project.getBaseline();

System.out.println("Current project name: " + project.getProjectProperties().getName());
System.out.println("Baseline project name: " + baseline.getProjectProperties().getName());
Manually Attached
As we saw in the previous section, MPXJ can attach a baseline ProjectFile
instance to the main project, and populate the relevant baseline attributes in
the main project. MPXJ will actually allow you to explicitly attach up to 11
baseline projects to a main project. Each project attached in this way will be
used to populate the relevant baseline attributes (for example, Baseline
Start, Baseline 1 Start, Baseline 2 Start, ... Baseline 10 Start). The limit of
11 attached baselines follows Microsoft Project's data model which allows up to
11 baselines to be recorded.
In this first example we can see that we are reading a main project and a single baseline file, and attaching the baseline as the "default" baseline. This means that attributes like Baseline Start, Baseline Finish and so on will be populated in the main schedule.
ProjectFile main = new UniversalProjectReader().read("main.pp");
ProjectFile baseline = new UniversalProjectReader().read("baseline.pp");
main.setBaseline(baseline);
This next example shows two baseline files being attached as Baseline 1 and Baseline 2, which means that the attributes Baseline 1 Start, Baseline 2 Start, Baseline 1 Finish, Baseline 2 Finish and so on will be populated.
ProjectFile main = new UniversalProjectReader().read("main.pp");
ProjectFile baseline1 = new UniversalProjectReader().read("baseline1.pp");
ProjectFile baseline2 = new UniversalProjectReader().read("baseline2.pp");
main.setBaseline(baseline1, 1);
main.setBaseline(baseline2, 2);
You can retrieve a list of all attached baselines using the
ProjectFile.getBaselines() method. Note that the returned list will always
contain 11 items, some of which may be null if the corresponding baseline has
not been set. You can also remove a baseline from the current schedule using
one of the ProjectFile.clearBaseline() methods.
Strategies
In an earlier section the use of baseline strategies was noted. Classes which
implement the BaselineStrategy interface are used to control how tasks in the
main and baseline schedule are matched, and which attributes are used to
populate the relevant baseline attributes.
MPXJ provides three implementations of the BaselineStrategy interface:
DefaultBaselineStrategyAstaBaselineStrategyPrimaveraBaselineStrategy
The DefaultBaselineStrategy matches tasks based on their GUID attribute, and
populates the main schedule's baseline attributes from their equivalent
attributes in the baseline schedule, for example, Baseline Duration will be
populated using the Duration attribute in the baseline schedule and so on. You
don't need to create new instances of this strategy as static instance is
provided as DefaultBaselineStrategy.INSTANCE.
The AstaBaselineStrategy matches tasks based on their Unique ID attribute, and
populates the main schedule's baseline attributes from their equivalent
attributes in the baseline schedule, for example, Baseline Duration will be
populated using the Duration attribute in the baseline schedule and so on. You
can't create new instances of this strategy, instead use the static instance
provided by AstaBaselineStrategy.INSTANCE.
Finally the PrimaveraBaselineStrategy matches tasks based on their Activity
ID. Two variants of the strategy are provided as
PrimaveraBaselineStrategy.PLANNED_ATTRIBUTES and
PrimaveraBaselineStrategy.CURRENT_ATTRIBUTES. The PLANNED_ATTRIBUTES
instance, as the name suggests, uses the planned attributes from the baseline
schedule to populate the baseline attributes in the main schedule, and the
CURRENT_ATTRIBUTES instance uses the current attributes from the baseline
schedule to populate the baseline attributes in the main schedule (for example,
Baseline Duration in the main schedule is populated using the Duration
attribute in the baseline schedule).
When using the MPXJ reader classes, the correct strategy for the specific
schedule type you are reading is selected for you. If you need behavior which
differs from one of the defaults you can provide your own BaselineStrategy
implementation. Where the reader class is automatically attaching baselines to
the main schedule, you can pass an instance of your strategy class to the
reader:
BaselineStrategy myStrategy = new MyBaselineStrategy();
PrimaveraPMFileReader reader = new PrimaveraPMFileReader();
reader.setBaselineStrategy(myStrategy);
ProjectFile file = reader.read("sample-pmxml.xml");
If you are reading the main and baseline schedules separately, you can set the baseline strategy on the main schedule, and this will be used when each baseline schedule is attached:
BaselineStrategy myStrategy = new MyBaselineStratgey();
ProjectFile main = new UniversalProjectReader().read("main.pp");
main.getProjectConfig().setBaselineStrategy(myStrategy);

ProjectFile baseline1 = new UniversalProjectReader().read("baseline1.pp");
ProjectFile baseline2 = new UniversalProjectReader().read("baseline2.pp");

main.setBaseline(baseline1, 1);
main.setBaseline(baseline2, 2);