How To: Use Timephased Data
What is Timephased Data?
Timephased data is a term which refers to data distributed over time. Take for example a simple 3 day task defined using Microsoft Project:
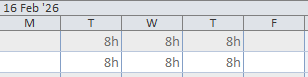
This task covers 3 working days, each having 8 hours, so in total we have 24 hours of work. If we open the "Task Usage" view in Microsoft Project we can see how Project has distributed the work over the three working days. For context, the grey bar at the top are the values rolled up to the task from the task's resource assignments shown as the rows with the white background below.
We can also change the scale we are using to look at the data, so for example we can see an hour-by-hour view:

In this view we are just looking at one working day, and you can see how the work being performed during that day is scheduled for the working hours, with a gap for a the lunch break, as defined in the resource's calendar.
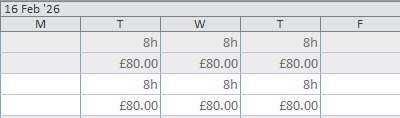
So far we have just looked at work being performed, but this view can also be used to examine cost and material consumption over time: In the example below, for the same task we were looking at previously I have added a line showing how the cost of the task (base on the hourly rate of the resource) is distributed over the task.
So far so good, but the examples above all just show a simple flat distribution of work and cost over time. A timephased view of data comes into its own where the data in question is not distributed evenly over time.
When planning a task, we may decide that most of the work, and therefore cost, is accrued in the early stages of the task. We can reflect this either by manually editing the hours work per day in Microsoft Project, or by asking Microsoft Project to apply a "work contour" (for example, front loaded, back loaded, and so on).
In the example below I have chosen to manually edit the working hours: our task is still being performed over 3 days, and we're still delivering 24 hours of work, except that now half of the work is being done on the first day, and very little is happening on the final day.
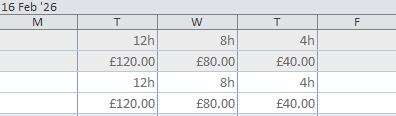
This is where having access to timephased data is important: looking at the Gantt chart alone doesn't allow us to readily understand when work is being performed, cost accrued or material used. This is also particularly important when we record actual values for our task: actual work performed may well not be distributed evenly across the duration of the task.
Timescales
Before we can think about accessing timephased data using MPXJ, we need to look at timescales. In order to retrieve timephased data, we need to specify a timescale: an overall period of time, divided into ranges. When we generate timephased data, our result will be a list of values, one for each of the ranges described by our timescale.
MPXJ represents a timescale as a List of LocalDateTimeRange instances. Each
LocalDateTimeRange represents a "half open" range: this means that the range
starts at the provided stat time, runs up to, but not including, the end time.
An example will make this clearer. The code below creates a range
representing today's date:
LocalDateTimeRange today = new LocalDateTimeRange(
    LocalDateTime.of(2026, 2, 18, 0, 0),
    LocalDateTime.of(2026, 2, 19, 0, 0));
var today = new DateTimeRange(
    new DateTime(2026, 2, 18),
    new DateTime(2026, 2, 19));
Today happens to be 18th February, but we can see that the range ends at
midnight on the 19th of February: the range covers the start of the day on the
18th (midnight: 00:00) and up to but not including 00:00 on the 19th of
February.
If we want to combine several LocalDateTimeRange instances together to make a
timescale, our next range would start at midnight on the 19th of February, and
extend until midnight on the 20th February:
LocalDateTimeRange day1 = new LocalDateTimeRange(
    LocalDateTime.of(2026, 2, 18, 0, 0),
    LocalDateTime.of(2026, 2, 19, 0, 0));
LocalDateTimeRange day2 = new LocalDateTimeRange(
    LocalDateTime.of(2026, 2, 19, 0, 0),
    LocalDateTime.of(2026, 2, 20, 0, 0));
List<LocalDateTimeRange> timescale = Arrays.asList(day1, day2)
var day1 = new DateTimeRange(
    new DateTime(2026, 2, 18),
    new DateTime(2026, 2, 19));
var day2 = new DateTimeRange(
    new DateTime(2026, 2, 19),
    new DateTime(2026, 2, 20));
var timescale = new List<DateTimeRange> { day1, day2 };
Fortunately, you don't need to worry about constructing a timescale for
yourself: MPXJ provides the TimescaleHelper. class to do this for you. To
generate a timescale to match the one shown in the samples from Microsoft
Project shown above, we can use the following code:
LocalDateTime startDate = LocalDateTime.of(2026, 2, 16, 0, 0, 0);
List<LocalDateTimeRange> ranges = new TimescaleHelper()
    .createTimescale(startDate, 5, TimescaleUnits.DAYS);
var startDate = new DateTime(2026, 2, 16);
var ranges = new TimescaleHelper()
    .CreateTimescale(startDate, 5, TimescaleUnits.Days);
This creates a timescale divided up into days, starting on the 16th February and running for 5 days. Alternatively you can provide start and end dates rather than counting the number of ranges. This is useful when you won't know exactly how many ranges will be generated to cover the period you are interested in.
LocalDateTime startDate = LocalDateTime.of(2026, 2, 16, 0, 0, 0);
LocalDateTime endDate = LocalDateTime.of(2026, 2, 20, 0, 0, 0);
List<LocalDateTimeRange> ranges = new TimescaleHelper()
    .createTimescale(startDate, endDate, TimescaleUnits.DAYS);
var startDate = new DateTime(2026, 2, 16);
var endDate = new DateTime(2026, 2, 20);
var ranges = new TimescaleHelper()
    .CreateTimescale(startDate, endDate, TimescaleUnits.Days);
The TimescaleUnits enumeration provides a variety of options to allow you to
break down time periods into ranges from MINUTES all the way up to YEARS.
Timephased Data
Timephased data in MPXJ starts life in resource assignments, and can then be rolled up through both the task hierarchy and also the resource hierarchy. This gives you the ability to look at the "big picture" view of work, cost, and material consumption then drill down into the detail at the individual resource assignment level.
Three types of timephased data are available using MPXJ: Work, Cost, and Material.
Work
The following timephased work values are available on assignments for Work
Resources and are expressed as Duration values. These values are not relevant
for Cost or Material resource assignments as these types of resources do not
represent work.
- Actual Regular Work: actual regular (non overtime) work for a resource assignment
- Actual Overtime Work: actual overtime work for a resource assignment
- Actual Work: the total of actual regular work plus actual overtime work for a resource assignment
- Remaining Regular Work: the remaining regular (non-overtime) work to complete a resource assignment
- Remaining Overtime Work: the remaining overtime work to complete a resource assignment
- Remaining Work: the total of remaining regular work plus remaining overtime work to complete a resource assignment
- Work: the total of actual work and remaining work for a resource assignment
- Baseline Work: work captured as a baseline for a resource assignment
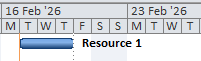
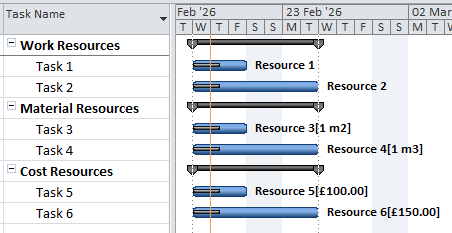
We'll work through some examples here, using a sample MPP file containing a variety of resource assignments. For ease of reference, here's a screenshot of the sample project we'll be working with:
First we'll set up our timescale which will cover the time occupied by the resource assignment we are working with. In this case we're asking MPXJ to show our timephased data split into days:
List<LocalDateTimeRange> ranges = new TimescaleHelper()
    .createTimescale(LocalDateTime.of(2026, 2, 18, 0, 0), 7, TimescaleUnits.DAYS);
var ranges = new TimescaleHelper()
    .CreateTimescale(new DateTime(2026, 2, 18), 7, TimescaleUnits.Days);
Assignments
Now we can locate the resource assignment we are interested in (in this case
it's Resource 2 assigned to Task 2 in the screenshot above), and use the
getTimephasedWork method, which will give us the the total of the actual and
remaining work for this assignment:
ResourceAssignment assignment = file.getResourceAssignments().getByUniqueID(6);
List<Duration> work = assignment.getTimephasedWork(ranges, TimeUnit.HOURS);
var assignment = file.ResourceAssignments.GetByUniqueID(6);
var work = assignment.GetTimephasedWork(ranges, TimeUnit.Hours);
You can see that we're calling the method and passing ranges which represents
our timescale. We also passing TimeUnit.HOURS to tell MPXJ what units we'd
like the work to be returned as. Finally we can add a couple of methods to help
us format the data MPXJ has returned to make it easier to read:
private void writeTableHeader(List<LocalDateTimeRange> ranges)
{
    String labels = ranges.stream()
        .map(r -> r.getStart().getDayOfWeek().name().substring(0, 1))
        .collect(Collectors.joining("|"));
    System.out.println("||" + labels + "|");

    String separator = ranges.stream()
        .map(r -> "---")
        .collect(Collectors.joining("|"));
    System.out.println("|---|" + separator+ "|");
}

private void writeTableRow(String label, List<?> data)
{
    String values = data.stream()
        .map(String::valueOf)
        .collect(Collectors.joining("|"));
    System.out.println("|" + label + "|" + values + "|");
}
private void WriteTableHeader(IList<DateTimeRange> ranges)
{
    var labels = String.Join('|', ranges
        .Select(r => r.Start.Value.DayOfWeek.ToString().Substring(0, 1)));
    System.Console.WriteLine("||" + labels + "|");

    var separator = String.Join('|', ranges.Select(r => "---"));
    System.Console.WriteLine("|---|" + separator+ "|");
}

private void WriteTableRow(string label, IList<Duration> data)
{
    var values = String.Join('|',
        data.Select(d => d == null ? "null" : d.ToString()));
    System.Console.WriteLine("|" + label + "|" + values + "|");
}

private void WriteTableRow(string label, IList<double?> data)
{
    var values = String.Join('|',
        data.Select(d => d == null ? "null" : d.ToString()));
    System.Console.WriteLine("|" + label + "|" + values + "|");
}
We'll call our new helper methods like this:
writeTableHeader(ranges);
writeTableRow(assignment.getResource().getName(), work);
WriteTableHeader(ranges);
WriteTableRow("Work", work);
Which will return a Markdown table as shown below, with the initial letter of the day name as the header, and a label as the first cell in each row:
||W|T|F|S|S|M|T|
|---|---|---|---|---|---|---|---|
|Work|8.0h|8.0h|8.0h|null|null|8.0h|8.0h|
For the remainder of the documentation we'll render the Markdown tables we produce from our samples to make them easier to read:
| W | T | F | S | S | M | T | |
|---|---|---|---|---|---|---|---|
| Work | 8.0h | 8.0h | 8.0h | null | null | 8.0h | 8.0h |
We can see that for this resource assignment, starting on Wednesday, we have 5
working days each with 8 hours of work per day. Note that the resource
assignment spans a weekend. On the weekend days MPXJ has returned a null
value. This indicates that this is non-working time, so no work is expected.
Typically if MPXJ returns a zero duration for a period, this indicates that the
period is normally working time, but that no work has been performed.
The example resource assignment we're using here is in progress, so rather than retrieving timephased Work, which combines both Actual and Remaining Work, we can request Actual and Remaining Work separately:
List<Duration> actualWork = assignment.getTimephasedActualWork(ranges, TimeUnit.HOURS);
List<Duration> remainingWork = assignment.getTimephasedRemainingWork(ranges, TimeUnit.HOURS);
writeTableHeader(ranges);
writeTableRow("Actual Work", actualWork);
writeTableRow("Remaining Work", remainingWork);
var actualWork = assignment.GetTimephasedActualWork(ranges, TimeUnit.Hours);
var remainingWork = assignment.GetTimephasedRemainingWork(ranges, TimeUnit.Hours);
WriteTableHeader(ranges);
WriteTableRow("Actual Work", actualWork);
WriteTableRow("Remaining Work", remainingWork);
| W | T | F | S | S | M | T | |
|---|---|---|---|---|---|---|---|
| Actual Work | 8.0h | 4.0h | null | null | null | null | null |
| Remaining Work | null | 4.0h | 8.0h | null | null | 8.0h | 8.0h |
What we can see here is that the ranges only overlap where there is both actual
and remaining work on one day. Once the actual work has been accounted for, the
remainder of the values returned by MPXJ will be null. Similarly the
Remaining Work timephased data will be null until we reach the first period
where there is Remaining Work.
Resources
As we mentioned before, the resource assignment we've been working with is for
Resource 2. We can request timephased data from the resource, which will roll
up values from all of this resource's assignments. In this case there is only
the one assignment for this resource, so the values we'll retrieve should match
those we've already seen from the resource assignment. The code sample below
illustrates calling the getTimephasedWork method on a Resource:
Resource resource2 = file.getResourceByID(2);
List<Duration> work = resource2.getTimephasedWork(ranges, TimeUnit.HOURS);
writeTableHeader(ranges);
writeTableRow("Resource 2 Work", work);
var resource2 = file.GetResourceByID(2);
var work = resource2.GetTimephasedWork(ranges, TimeUnit.Hours);
WriteTableHeader(ranges);
WriteTableRow("Resource 2 Work", work);
Here's the timephased Work from Resource 2:
| W | T | F | S | S | M | T | |
|---|---|---|---|---|---|---|---|
| Resource 2 Work | 8.0h | 8.0h | 8.0h | null | null | 8.0h | 8.0h |
Tasks
Perhaps more interesting is what we see when we look at our tasks. In the sample file (as per the screenshot above), Task 1 and Task 2 represent work carried out by Resources 1 and 2. These tasks have been grouped together under the "Work Resources" summary task. Let's write some code to show how timephased Work is retrieved from tasks, and in doing so we'll see how the work from these two child tasks is rolled up to the parent task.
Task summaryTask = file.getTaskByID(1);
Task task1 = file.getTaskByID(2);
Task task2 = file.getTaskByID(3);
List<Duration> summaryWork = summaryTask.getTimephasedWork(ranges, TimeUnit.HOURS);
List<Duration> task1Work = task1.getTimephasedWork(ranges, TimeUnit.HOURS);
List<Duration> task2Work = task2.getTimephasedWork(ranges, TimeUnit.HOURS);
writeTableHeader(ranges);
writeTableRow("Summary Work", summaryWork);
writeTableRow("Task 1 Work", task1Work);
writeTableRow("Task 2 Work", task2Work);
var summaryTask = file.GetTaskByID(1);
var task1 = file.GetTaskByID(2);
var task2 = file.GetTaskByID(3);
var summaryWork = summaryTask.GetTimephasedWork(ranges, TimeUnit.Hours);
var task1Work = task1.GetTimephasedWork(ranges, TimeUnit.Hours);
var task2Work = task2.GetTimephasedWork(ranges, TimeUnit.Hours);
WriteTableHeader(ranges);
WriteTableRow("Summary Work", summaryWork);
WriteTableRow("Task 1 Work", task1Work);
WriteTableRow("Task 2 Work", task2Work);
Here's the output from our code:
| W | T | F | S | S | M | T | |
|---|---|---|---|---|---|---|---|
| Summary Work | 16.0h | 16.0h | 16.0h | null | null | 8.0h | 8.0h |
| Task 1 Work | 8.0h | 8.0h | 8.0h | null | null | null | null |
| Task 2 Work | 8.0h | 8.0h | 8.0h | null | null | 8.0h | 8.0h |
We can see from these results how the work for each child task is rolled up to
the summary task. You can also see how null values are handled: on the
weekend days where both tasks have null values for their work, the rolled up
work is also represented as null. Where there are a mixture of null and
non-null values, the null values are just treated as zero.
Cost
The following timephased cost values are available on assignments for all
resource types and are expressed as Number values in Java (double? in .Net).
- Actual Regular Cost: actual regular (non overtime) cost for a resource assignment
- Actual Overtime Cost: actual overtime cost for a resource assignment
- Actual Cost: the total of actual regular cost plus actual overtime cost for a resource assignment
- Remaining Regular Cost: the remaining regular (non-overtime) cost to complete a resource assignment
- Remaining Overtime Cost: the remaining overtime cost to complete a resource assignment
- Remaining Cost: the total of remaining regular cost plus remaining overtime cost to complete a resource assignment
- Cost: the total of actual cost and remaining cost for a resource assignment
- Baseline Cost: cost captured as a baseline for a resource assignment
The methods called to retrieve timephased cost information from resource
assignments, resources and task are the same as those we've just seen in the
previous section where we were retrieving timephased work. The two main
differences are that these methods return List<Number> rather than
List<Duration, and they do not take a TimeUnit argument as this is not
relevant for cost.
The example below covers these points. Here we are looking at the same scenario that we illustrated at the end of the timephased work section where we are retrieving costs from three tasks and illustrating how these roll up from child tasks to summary tasks:
Task summaryTask = file.getTaskByID(1);
Task task1 = file.getTaskByID(2);
Task task2 = file.getTaskByID(3);
List<Number> summaryCost = summaryTask.getTimephasedCost(ranges);
List<Number> task1Cost = task1.getTimephasedCost(ranges);
List<Number> task2Cost = task2.getTimephasedCost(ranges);
writeTableHeader(ranges);
writeTableRow("Summary Cost", summaryCost);
writeTableRow("Task 1 Cost", task1Cost);
writeTableRow("Task 2 Cost", task2Cost);
var summaryTask = file.GetTaskByID(1);
var task1 = file.GetTaskByID(2);
var task2 = file.GetTaskByID(3);
var summaryCost = summaryTask.GetTimephasedCost(ranges);
var task1Cost = task1.GetTimephasedCost(ranges);
var task2Cost = task2.GetTimephasedCost(ranges);
WriteTableHeader(ranges);
WriteTableRow("Summary Cost", summaryCost);
WriteTableRow("Task 1 Cost", task1Cost);
WriteTableRow("Task 2 Cost", task2Cost);
The output from this code is shown below:
| W | T | F | S | S | M | T | |
|---|---|---|---|---|---|---|---|
| Summary Cost | 184.0 | 184.0 | 184.0 | null | null | 104.0 | 104.0 |
| Task 1 Cost | 80.0 | 80.0 | 80.0 | null | null | null | null |
| Task 2 Cost | 104.0 | 104.0 | 104.0 | null | null | 104.0 | 104.0 |
You can see that, as expected, the values we are now retrieving are numeric
rather than Duration instances, but the same logic is still applied for
non-working periods where null is returned rather than zero.
Material
The following timephased material values are available on assignments for
material resources, and are expressed as Number values in Java
(double? in .Net).
- Actual Material: the actual material utilised for a resource assignment
- Remaining Material: the remaining material to be utilised to complete a resource assignment
- Material: the total of actual material and remaining material for a resource assignment
- Baseline Material: material utilisation captured as a baseline for a resource assignment
The key differences between timephased material values and the other timephased values we've been looking at is that material values are not rolled up to the task level, and are not rolled up through the resource hierarchy. This is due to the fact that we cannot be sure that we would be rolling up quantities for the same type of resource: it wouldn't make sense to combine figures for cubic metres of gravel with cubic metres of sand - even though they share the same units!
Timephased material is however rolled up to the resource level by default as we know that, by definition, the values we are summarising all relate to the same type of material with the same measurement units.
The sample code below provides an illustration of how timephased material values are retrieved:
// Retrieve an assignment for a  material resource
ResourceAssignment assignment = file.getResourceAssignments().getByUniqueID(11);

// Create labels using the correct units for the resource
String materialUnits = "(" + assignment.getResource().getMaterialLabel() + ")";
String actualMaterialLabel = "Actual Material " + materialUnits;
String remainingMaterialLabel = "Remaining Material " + materialUnits;
String materialLabel = "Material " + materialUnits;

// Retrieve the timephased values
List<Number> actualMaterial = assignment.getTimephasedActualMaterial(ranges);
List<Number> remainingMaterial = assignment.getTimephasedRemainingMaterial(ranges);
List<Number> material = assignment.getTimephasedMaterial(ranges);

// Present the values as a table
writeTableHeader(ranges);
writeTableRow(actualMaterialLabel, actualMaterial);
writeTableRow(remainingMaterialLabel, remainingMaterial);
writeTableRow(materialLabel, material);
// Retrieve an assignment for a  material resource
var assignment = file.ResourceAssignments.GetByUniqueID(11);

// Create labels using the correct units for the resource
var materialUnits = "(" + assignment.Resource.MaterialLabel + ")";
var actualMaterialLabel = "Actual Material " + materialUnits;
var remainingMaterialLabel = "Remaining Material " + materialUnits;
var materialLabel = "Material " + materialUnits;

// Retrieve the timephased values
var actualMaterial = assignment.GetTimephasedActualMaterial(ranges);
var remainingMaterial = assignment.GetTimephasedRemainingMaterial(ranges);
var material = assignment.GetTimephasedMaterial(ranges);

// Present the values as a table
WriteTableHeader(ranges);
WriteTableRow(actualMaterialLabel, actualMaterial);
WriteTableRow(remainingMaterialLabel, remainingMaterial);
WriteTableRow(materialLabel, material);
You can see in the code that we are using the Material Label property of the resource to augment the labels we create for each row in the table with the correct units (in this case cubic metres). Here's the result of running the sample code:
| W | T | F | S | S | M | T | |
|---|---|---|---|---|---|---|---|
| Actual Material (m3) | 0.2 | 0.1 | null | null | null | null | null |
| Remaining Material (m3) | null | 0.1 | 0.2 | null | null | 0.2 | 0.2 |
| Material (m3) | 0.2 | 0.2 | 0.2 | null | null | 0.2 | 0.2 |
Parametrised Methods
In the examples we have looked at so far we've used specific methods to retrieve
each type of timephased data, for example to retrieve timephased actual work,
we've called getTimephasedActualWork. This works well when we know ahead of
time exactly which timephased data we want to read. If we need a little more
flexibility we can use parametrised methods to access this data.
The FieldContainer interface, which is implemented by the Resource, Task
and ResourceAssignment classes defines two parametrised methods for
retrieving timephased data: getTimephasedDurationValues (which can be used to
retrieve timephased work) and getTimephasedNumericValues (which can be used
to retrieve timephased cost and material utilisation).
Work
The example below shows how the getTimephasedDurationValues method can be
used to retrieve timephased work from a task.
// Retrieve tasks
Task summaryTask = file.getTaskByID(1);
Task task1 = file.getTaskByID(2);
Task task2 = file.getTaskByID(3);

// Retrieve timephased work
List<Duration> summaryWork = summaryTask.getTimephasedDurationValues(TaskField.WORK, ranges, TimeUnit.HOURS);
List<Duration> task1Work = task1.getTimephasedDurationValues(TaskField.WORK, ranges, TimeUnit.HOURS);
List<Duration> task2Work = task2.getTimephasedDurationValues(TaskField.WORK, ranges, TimeUnit.HOURS);

// Present the values as a table
writeTableHeader(ranges);
writeTableRow("Summary Work", summaryWork);
writeTableRow("Task 1 Work", task1Work);
writeTableRow("Task 2 Work", task2Work);
// Retrieve tasks
var summaryTask = file.GetTaskByID(1);
var task1 = file.GetTaskByID(2);
var task2 = file.GetTaskByID(3);

// Retrieve timephased work
var summaryWork = summaryTask.GetTimephasedDurationValues(TaskField.Work, ranges, TimeUnit.Hours);
var task1Work = task1.GetTimephasedDurationValues(TaskField.Work, ranges, TimeUnit.Hours);
var task2Work = task2.GetTimephasedDurationValues(TaskField.Work, ranges, TimeUnit.Hours);

// Present the values as a table
WriteTableHeader(ranges);
WriteTableRow("Summary Work", summaryWork);
WriteTableRow("Task 1 Work", task1Work);
WriteTableRow("Task 2 Work", task2Work);
The first argument passed to the method is a FieldType instance, in this case
TaskField.WORK. This is used to identify the type of timephased data we
required. Any FieldType instance can be passed here although the resulting
list will only contain null values for field types which don't support
timephased data. The remaining arguments passed to the method, the timescale
and the units type for the returned Duration instances, are the same as for
the non-parametrised methods we've looked at previously.
Cost
Here's another example illustrating these parametrised methods being used to retrieve timephased cost data.
// Retrieve a resource assignment
ResourceAssignment assignment = file.getResourceAssignments().getByUniqueID(6);

// Retrieve timephased costs
List<Number> actualCost = assignment.getTimephasedNumericValues(AssignmentField.ACTUAL_COST, ranges);
List<Number> remainingCost = assignment.getTimephasedNumericValues(AssignmentField.REMAINING_COST, ranges);
List<Number> cost = assignment.getTimephasedNumericValues(AssignmentField.COST, ranges);

// Present the values as a table
writeTableHeader(ranges);
writeTableRow("Actual Cost", actualCost);
writeTableRow("Remaining Cost", remainingCost);
writeTableRow("Cost", cost);
// Retrieve a resource assignment
var assignment = file.ResourceAssignments.GetByUniqueID(6);

// Retrieve timephased costs
var actualCost = assignment.GetTimephasedNumericValues(AssignmentField.ActualCost, ranges);
var remainingCost = assignment.GetTimephasedNumericValues(AssignmentField.RemainingCost, ranges);
var cost = assignment.GetTimephasedNumericValues(AssignmentField.Cost, ranges);

// Present the values as a table
WriteTableHeader(ranges);
WriteTableRow("Actual Cost", actualCost);
WriteTableRow("Remaining Cost", remainingCost);
WriteTableRow("Cost", cost);
In this case we're retrieving details from a resource assignment, so we're using
values from the AssignmentField enumeration to select the timephased data
we're interested in. As we're retrieving costs, we're retrieving a List or
Number instances.
Material
Finally we'll retrieve timephased material utilisation from a resource:
// Retrieve a material resource
Resource resource = file.getResourceByID(4);

// Create labels using the correct units for the resource
String materialUnits = "(" + resource.getMaterialLabel() + ")";
String actualMaterialLabel = "Actual Material " + materialUnits;
String remainingMaterialLabel = "Remaining Material " + materialUnits;
String materialLabel = "Material " + materialUnits;

// Retrieve the timephased values
List<Number> actualMaterial = resource.getTimephasedNumericValues(ResourceField.ACTUAL_MATERIAL, ranges);
List<Number> remainingMaterial = resource.getTimephasedNumericValues(ResourceField.REMAINING_MATERIAL, ranges);
List<Number> material = resource.getTimephasedNumericValues(ResourceField.MATERIAL, ranges);

// Present the values as a table
writeTableHeader(ranges);
writeTableRow(actualMaterialLabel, actualMaterial);
writeTableRow(remainingMaterialLabel, remainingMaterial);
writeTableRow(materialLabel, material);
// Retrieve a material resource
var resource = file.GetResourceByID(4);

// Create labels using the correct units for the resource
var materialUnits = "(" + resource.MaterialLabel + ")";
var actualMaterialLabel = "Actual Material " + materialUnits;
var remainingMaterialLabel = "Remaining Material " + materialUnits;
var materialLabel = "Material " + materialUnits;

// Retrieve the timephased values
var actualMaterial = resource.GetTimephasedNumericValues(ResourceField.ActualMaterial, ranges);
var remainingMaterial = resource.GetTimephasedNumericValues(ResourceField.RemainingMaterial, ranges);
var material = resource.GetTimephasedNumericValues(ResourceField.Material, ranges);

// Present the values as a table
WriteTableHeader(ranges);
WriteTableRow(actualMaterialLabel, actualMaterial);
WriteTableRow(remainingMaterialLabel, remainingMaterial);
WriteTableRow(materialLabel, material);
As the code above illustrates the getTimephasedNumericValues method can be
used to retrieve both cost and material timephased data as both of these types
of data are expressed as List<Number>. We can also see that we're using
values from the ResourceField enumeration to select the data we need as we're
working with a Resource instance.
Raw Timephased Data
So far we've concentrated on how to access timephased data for a given period of time, but we've not considered how that data is stored. As noted in an earlier section timephased data originates from resource assignments and is actually stored as six distinct sets of data:
- Actual Overtime Work
- Actual Regular Work
- Remaining Overtime Work
- Remaining Regular Work
- Baseline Cost
- Baseline Work
As you've probably already realised, the timephased data for Actual Work, Remaining Work, Regular Work, Overtime Work and Work are all derived from these core data sets rather than being stored separately. Similarly, all timephased costs, with the exception of baseline costs, are derived from timephased work. This is possible as the Cost Rate Tables for resources allow for rates to be recorded along with effective from/to dates. Used appropriately this ensures that historic cost data will remain accurate when generating timephased cost data, even when current rates have changed.
What you may also have spotted when looking at the list of data sets above
is that material is not mentioned! Timephased data for material utilisation
is actually represented as work, using Duration instances - in effect the
time unit component of the Duration is ignored with the numeric value of
the Duration representing the material amount. MPXJ provides dedicated
methods for reading timephased material utilisation to avoid the need to
perform a conversion each time you use it.
To distinguish between reading timephased data in the form we've been discussing
in the rest of this document (as data distributed over a given timescale), the
methods used to retrieve the underlying timephased data representation all use
the term "raw" timephased data. The ResourceAssignment class provides the
following methods to retrieve the data in this form:
getRawTimephasedActualOvertimeWorkgetRawTimephasedActualRegularWorkgetRawTimephasedRemainingOvertimeWorkgetRawTimephasedRemainingRegularWorkgetRawTimephasedBaselineWorkgetRawTimephasedBaselineCost
The two baseline methods differ from the rest as there can be multiple baselines so these methods take a integer argument to select the baseline required (passing 0 will return the data for "Baseline", 1 will return the data for "Baseline 1" and so on).
Default Data
Raw timephased work is represented by the TimephasedWork class, which exposes
the following attributes:
- Start
- Finish
- Total Amount
- Amount per Hour
For the most straightforward case, a resource assignment will only need to have
a single TimephasedWork instance to describe actual or remaining work. The
TimephasedWork item will start at the beginning of the resource assignment,
finish at the end of the resource assignment, and will show the total amount of
work represented by the assignment. The amount per hour is equivalent to
the "units" attribute of the resource assignment. For example, if a resource is
assigned with a units attribute representing 100% utilisation, the amount per
hour attribute will be 1 hour. If the resource is assigned at 200% utilisation,
the amount per hour will be 2 hours, and so on.
The tables below illustrate how the raw timephased data for our example three day task can be used to represent the task before it starts, in progress and when completed.
In this initial table we can see that the task has not started, the Raw Timephased Actual work list contains no data, and there is a single entry in the Raw Timephased Remaining Work list.
| Raw Timephased Actual Work | Raw Timephased Remaining Work | |
|---|---|---|
| Start | 2006-02-17 08:00 | |
| Finish | 2006-02-19 17:00 | |
| Total Amount | 24h | |
| Amount per Hour | 1h |
After one day of work, the lists will look like this:
| Raw Timephased Actual Work | Raw Timephased Remaining Work | |
|---|---|---|
| Start | 2006-02-17 08:00 | 2006-02-18 08:00 |
| Finish | 2006-02-17 17:00 | 2006-02-19 17:00 |
| Total Amount | 8h | 16h |
| Amount per Hour | 1h | 1h |
If we record another hour of progress, the lists will look like this:
| Raw Timephased Actual Work | Raw Timephased Remaining Work | |
|---|---|---|
| Start | 2006-02-17 08:00 | 2006-02-18 09:00 |
| Finish | 2006-02-18 09:00 | 2006-02-19 17:00 |
| Total Amount | 9h | 15h |
| Amount per Hour | 1h | 1h |
Finally, once the task is complete the lists will look like this:
| Raw Timephased Actual Work | Raw Timephased Remaining Work | |
|---|---|---|
| Start | 2006-02-17 08:00 | |
| Finish | 2006-02-18 17:00 | |
| Total Amount | 24h | |
| Amount per Hour | 1h |
In all of the examples above, we've only needed a single entry in each list to
represent how actual and remaining work is distributed. The key point here is
that when we come to working with this representation to generate timephased
data over a given timescale, we're relying on the resource assignment's
effective calendar to provide us with the working and non-working time that
allows us to spread the work described by each TimephasedWork instance over a
given timescale.
Modified Data
In the last section we saw how, for most resource assignments, only one or two
TimephasedWork instances are required to describe how actual and remaining
work is distributed. Let's now move on to look at a more interesting example:
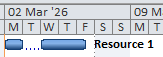
The screenshot above is from Microsoft Project and shows a split task, which is where we have working time available, but no work is being performed. You can see this as the gap in the bar (a "split task"). What you can't see from the Gantt chart is that the work is actually being performed at different rates. Let take a look at the "Task Usage" view to see this more clearly:
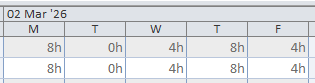
The view above shows that on the Tuesday no work is being done (zero hours of work) but when work starts again on Wednesday, only four hours of work is being undertaken - the equivalent of the resource working at 50% utilisation. Finally work is being carried out at a normal rate on Thursday and Friday.
Here's how this looks as TimephasedWork items:
| TimephasedWork 1 | TimephasedWork 2 | TimephasedWork 3 | TimephasedWork 4 | |
|---|---|---|---|---|
| Start | 2026-03-02 08:00 | 2026-03-03 08:00 | 2026-03-04 08:00 | 2026-03-05 08:00 |
| Finish | 2026-03-02 17:00 | 2026-03-03 17:00 | 2026-03-04 17:00 | 2026-03-06 12:00 |
| Per Hour | 1h | 0h | 0.5h | 1h |
| Total | 8h | 0h | 4h | 12h |
The first and last items are "standard" items which just show work being carried out according to the resource assignment's effective calendar. The second item makes a day which is normally a working day into a non-working day: the total amount of work is set to zero and, unsurprisingly, the amount of work per hour is also zero. Finally, the third item shows work taking place according to the normal working hours from the calendar, but at 50% utilisation (30 minutes work for each working hour on the calendar)
In the example above, the task has no progress, so all of these items would appear in the Raw Timephased Remaining Work list, however the same principles would apply as the task is progressed: zero total hours work and zero work per hour are used to indicate a normally working period is non-working, and a new item would be used to indicate a period of time where the utilisation (via the amount per hour) has been changed.
Microsoft Project will only allow you to modify the timephased data for remaining work to change working time into non-working time. It won't let you assign work to non-working days (for example you can't add work over a weekend, if the weekend is marked as non-working in the effective calendar). To make non-working time into working time you would need to change the calendar by adding an exception. This constraint is not present when you are recording actual work: actual work can be added on any day, regardless of whether the calendar indicates that it is working or non-working.
Cost
As we noted earlier, cost is derived from timephased work for everything except
baseline cost. For baseline cost there are a set of Raw Timephased Baseline
Cost attributes, one per baseline. These attributes are represented as
TimephasedCost. These differ from TimephasedWork instances only in that
they record their Total Amount and Amount PerHour attributes as a Number
values rather than Duration values.
Creating Timephased Data
This section provides some brief examples of how timephased data can be added to resource assignments. By default there is no need to add timephased data to a resource assignment if work is simply being carried out on standard working days and at the utilisation defined by the Units attribute of the resource assignment. In the following examples we'll explore various non-default scenarios.
These examples assume that you will be writing the completed project to an MSPDI file to be opened by Microsoft Project.
Custom Distribution
In this first example we're changing the distribution of working hours for a resource assignment so that the first day has 10 hours of work, the second day has 6 hours of work, and the remaining days have the default 8 hours of work per day.
// Create a resource assignment
ResourceAssignment assignment = task.addResourceAssignment(resource);
assignment.setStart(task.getStart());
assignment.setWork(Duration.getInstance(40, TimeUnit.HOURS));
assignment.setRemainingWork(Duration.getInstance(40, TimeUnit.HOURS));

// Day 1 - 10h
TimephasedWork day1RemainingWork = new TimephasedWork();
day1RemainingWork.setStart(LocalDateTime.of(2024, 3, 4, 8, 0));
day1RemainingWork.setFinish(LocalDateTime.of(2024, 3, 4, 17, 0));
day1RemainingWork.setAmountPerHour(Duration.getInstance(1.25, TimeUnit.HOURS));
day1RemainingWork.setTotalAmount(Duration.getInstance(10, TimeUnit.HOURS));

// Day 2 - 6h
TimephasedWork day2RemainingWork = new TimephasedWork();
day2RemainingWork.setStart(LocalDateTime.of(2024, 3, 5, 8, 0));
day2RemainingWork.setFinish(LocalDateTime.of(2024, 3, 5, 17, 0));
day2RemainingWork.setAmountPerHour(Duration.getInstance(0.75, TimeUnit.HOURS));
day2RemainingWork.setTotalAmount(Duration.getInstance(6, TimeUnit.HOURS));

// Remaining days - 8h/day
TimephasedWork remainingWork = new TimephasedWork();
remainingWork.setStart(LocalDateTime.of(2024, 3, 6, 8, 0));
remainingWork.setFinish(LocalDateTime.of(2024, 3, 8, 17, 0));
remainingWork.setAmountPerHour(Duration.getInstance(1, TimeUnit.HOURS));
remainingWork.setTotalAmount(Duration.getInstance(24, TimeUnit.HOURS));

// Add timephased data to the resource assignment
assignment.getRawTimephasedRemainingRegularWork()
    .addAll(Arrays.asList(day1RemainingWork, day2RemainingWork, remainingWork));
// Create a resource assignment
var assignment = task.AddResourceAssignment(resource);
assignment.Start = task.Start;
assignment.Work = Duration.GetInstance(40, TimeUnit.Hours);
assignment.RemainingWork = Duration.GetInstance(40, TimeUnit.Hours);

// Day 1 - 10h
var day1RemainingWork = new TimephasedWork();
day1RemainingWork.Start = new DateTime(2024, 3, 4, 8, 0, 0);
day1RemainingWork.Finish = new DateTime(2024, 3, 4, 17, 0, 0);
day1RemainingWork.AmountPerHour = Duration.GetInstance(1.25, TimeUnit.Hours);
day1RemainingWork.TotalAmount = Duration.GetInstance(10, TimeUnit.Hours);

// Day 2 - 6h
TimephasedWork day2RemainingWork = new TimephasedWork();
day2RemainingWork.Start = new DateTime(2024, 3, 5, 8, 0, 0);
day2RemainingWork.Finish = new DateTime(2024, 3, 5, 17, 0, 0);
day2RemainingWork.AmountPerHour = Duration.GetInstance(0.75, TimeUnit.Hours);
day2RemainingWork.TotalAmount = Duration.GetInstance(6, TimeUnit.Hours);

// Remaining days - 8h/day
TimephasedWork remainingWork = new TimephasedWork();
remainingWork.Start = new DateTime(2024, 3, 6, 8, 0, 0);
remainingWork.Finish = new DateTime(2024, 3, 8, 17, 0, 0);
remainingWork.AmountPerHour = Duration.GetInstance(1, TimeUnit.Hours);
remainingWork.TotalAmount = Duration.GetInstance(24, TimeUnit.Hours);

// Add timephased data to the resource assignment
var remainingRegularWork = assignment.RawTimephasedRemainingRegularWork;
remainingRegularWork.Add(day1RemainingWork);
remainingRegularWork.Add(day2RemainingWork);
remainingRegularWork.Add(remainingWork);
In this case we have a task without any progress, so we're just adding the
TimephasedWork items we create to the Raw Timephased Remaining Regular Work
list. Note that the total amount of work represented by our TimephasedWork
instances matches the total work assigned to the resource assignment.
The next example shows creation of an in-progress resource assignment:
// Create a resource assignment
ResourceAssignment assignment = task.addResourceAssignment(resource);
assignment.setStart(task.getStart());
assignment.setActualStart(task.getStart());
assignment.setWork(Duration.getInstance(40, TimeUnit.HOURS));
assignment.setActualWork(Duration.getInstance(5, TimeUnit.HOURS));
assignment.setRemainingWork(Duration.getInstance(35, TimeUnit.HOURS));

// Important - MS Project needs this as well as the timephased data
// to correctly represent the actual and remaining work
assignment.setStop(LocalDateTime.of(2024, 3, 4, 12, 0));
assignment.setResume(LocalDateTime.of(2024, 3, 4, 13, 0));

// Day 1 actual work - 5h
TimephasedWork day1ActualWork = new TimephasedWork();
day1ActualWork.setStart(LocalDateTime.of(2024, 3, 4, 8, 0));
day1ActualWork.setFinish(LocalDateTime.of(2024, 3, 4, 12, 0));
day1ActualWork.setAmountPerHour(Duration.getInstance(1.25, TimeUnit.HOURS));
day1ActualWork.setTotalAmount(Duration.getInstance(5, TimeUnit.HOURS));

// Day 1 remaining - 5h
TimephasedWork day1RemainingWork = new TimephasedWork();
day1RemainingWork.setStart(LocalDateTime.of(2024, 3, 4, 13, 0));
day1RemainingWork.setFinish(LocalDateTime.of(2024, 3, 4, 17, 0));
day1RemainingWork.setAmountPerHour(Duration.getInstance(1.25, TimeUnit.HOURS));
day1RemainingWork.setTotalAmount(Duration.getInstance(5, TimeUnit.HOURS));

// Day 2 remaining - 6h
TimephasedWork day2RemainingWork = new TimephasedWork();
day2RemainingWork.setStart(LocalDateTime.of(2024, 3, 5, 8, 0));
day2RemainingWork.setFinish(LocalDateTime.of(2024, 3, 5, 17, 0));
day2RemainingWork.setAmountPerHour(Duration.getInstance(0.75, TimeUnit.HOURS));
day2RemainingWork.setTotalAmount(Duration.getInstance(6, TimeUnit.HOURS));

// Remaining days - 8h/day
TimephasedWork remainingWork = new TimephasedWork();
remainingWork.setStart(LocalDateTime.of(2024, 3, 6, 8, 0));
remainingWork.setFinish(LocalDateTime.of(2024, 3, 8, 17, 0));
remainingWork.setAmountPerHour(Duration.getInstance(1, TimeUnit.HOURS));
remainingWork.setTotalAmount(Duration.getInstance(24, TimeUnit.HOURS));

assignment.getRawTimephasedActualRegularWork().add(day1ActualWork);
assignment.getRawTimephasedRemainingRegularWork()
    .addAll(Arrays.asList(day1RemainingWork, day2RemainingWork, remainingWork));
// Create a resource assignment
var assignment = task.AddResourceAssignment(resource);
assignment.Start = task.Start;
assignment.ActualStart = task.Start;
assignment.Work = Duration.GetInstance(40, TimeUnit.Hours);
assignment.ActualWork = Duration.GetInstance(5, TimeUnit.Hours);
assignment.RemainingWork = Duration.GetInstance(35, TimeUnit.Hours);

// Important - MS Project needs this as well as the timephased data
// to correctly represent the actual and remaining work
assignment.Stop = new DateTime(2024, 3, 4, 12, 0, 0);
assignment.Resume = new DateTime(2024, 3, 4, 13, 0, 0);

// Day 1 actual work - 5h
var day1ActualWork = new TimephasedWork();
day1ActualWork.Start = new DateTime(2024, 3, 4, 8, 0, 0);
day1ActualWork.Finish = new DateTime(2024, 3, 4, 12, 0, 0);
day1ActualWork.AmountPerHour = Duration.GetInstance(1.25, TimeUnit.Hours);
day1ActualWork.TotalAmount = Duration.GetInstance(5, TimeUnit.Hours);

// Day 1 remaining - 5h
var day1RemainingWork = new TimephasedWork();
day1RemainingWork.Start = new DateTime(2024, 3, 4, 13, 0, 0);
day1RemainingWork.Finish = new DateTime(2024, 3, 4, 17, 0, 0);
day1RemainingWork.AmountPerHour = Duration.GetInstance(1.25, TimeUnit.Hours);
day1RemainingWork.TotalAmount = Duration.GetInstance(5, TimeUnit.Hours);

// Day 2 remaining - 6h
var day2RemainingWork = new TimephasedWork();
day2RemainingWork.Start = new DateTime(2024, 3, 5, 8, 0, 0);
day2RemainingWork.Finish = new DateTime(2024, 3, 5, 17, 0, 0);
day2RemainingWork.AmountPerHour = Duration.GetInstance(0.75, TimeUnit.Hours);
day2RemainingWork.TotalAmount = Duration.GetInstance(6, TimeUnit.Hours);

// Remaining days - 8h/day
var remainingWork = new TimephasedWork();
remainingWork.Start = new DateTime(2024, 3, 6, 8, 0, 0);
remainingWork.Finish = new DateTime(2024, 3, 8, 17, 0, 0);
remainingWork.AmountPerHour = Duration.GetInstance(1, TimeUnit.Hours);
remainingWork.TotalAmount = Duration.GetInstance(24, TimeUnit.Hours);

assignment.RawTimephasedActualRegularWork.Add(day1ActualWork);
var remainingRegularWork = assignment.RawTimephasedRemainingRegularWork;
remainingRegularWork.Add(day1RemainingWork);
remainingRegularWork.Add(day2RemainingWork);
remainingRegularWork.Add(remainingWork);
In the code above we can see that we've created a TimephasedWork instance
to represent the actual work, and added this to the Raw Timephased Actual Regular
Work list. We then add TimephasedWork items to the Raw Timephased Remaining
Work list for the remaining work. One point to note is that to ensure that
this assignment is interpreted correctly by Microsoft Project, we're
setting the Stop and Resume attributes to show when the actual work finished,
and the remaining work is due to start.
Our next example illustrates a completed resource assignment:
// Create a resource assignment
ResourceAssignment assignment = task.addResourceAssignment(resource);
assignment.setStart(task.getStart());
assignment.setActualStart(task.getStart());
assignment.setWork(Duration.getInstance(40, TimeUnit.HOURS));
assignment.setActualWork(Duration.getInstance(40, TimeUnit.HOURS));
assignment.setRemainingWork(Duration.getInstance(0, TimeUnit.HOURS));

// Day 1 actual work - 10h
TimephasedWork day1ActualWork = new TimephasedWork();
day1ActualWork.setStart(LocalDateTime.of(2024, 3, 4, 8, 0));
day1ActualWork.setFinish(LocalDateTime.of(2024, 3, 4, 17, 0));
day1ActualWork.setAmountPerHour(Duration.getInstance(1.25, TimeUnit.HOURS));
day1ActualWork.setTotalAmount(Duration.getInstance(10, TimeUnit.HOURS));

// Day 2 actual - 6h
TimephasedWork day2ActualWork = new TimephasedWork();
day2ActualWork.setStart(LocalDateTime.of(2024, 3, 5, 8, 0));
day2ActualWork.setFinish(LocalDateTime.of(2024, 3, 5, 17, 0));
day2ActualWork.setAmountPerHour(Duration.getInstance(0.75, TimeUnit.HOURS));
day2ActualWork.setTotalAmount(Duration.getInstance(6, TimeUnit.HOURS));

// Remaining days - 8h/day
TimephasedWork actualWork = new TimephasedWork();
actualWork.setStart(LocalDateTime.of(2024, 3, 6, 8, 0));
actualWork.setFinish(LocalDateTime.of(2024, 3, 8, 17, 0));
actualWork.setAmountPerHour(Duration.getInstance(1, TimeUnit.HOURS));
actualWork.setTotalAmount(Duration.getInstance(24, TimeUnit.HOURS));

assignment.getRawTimephasedActualRegularWork()
    .addAll(Arrays.asList(day1ActualWork, day2ActualWork, actualWork));
// Create a resource assignment
var assignment = task.AddResourceAssignment(resource);
assignment.Start = task.Start;
assignment.ActualStart = task.Start;
assignment.Work = Duration.GetInstance(40, TimeUnit.Hours);
assignment.ActualWork = Duration.GetInstance(40, TimeUnit.Hours);
assignment.RemainingWork = Duration.GetInstance(0, TimeUnit.Hours);

// Day 1 actual work - 10h
var day1ActualWork = new TimephasedWork();
day1ActualWork.Start = new DateTime(2024, 3, 4, 8, 0, 0);
day1ActualWork.Finish = new DateTime(2024, 3, 4, 17, 0, 0);
day1ActualWork.AmountPerHour = Duration.GetInstance(1.25, TimeUnit.Hours);
day1ActualWork.TotalAmount = Duration.GetInstance(10, TimeUnit.Hours);

// Day 2 actual - 6h
var day2ActualWork = new TimephasedWork();
day2ActualWork.Start = new DateTime(2024, 3, 5, 8, 0, 0);
day2ActualWork.Finish = new DateTime(2024, 3, 5, 17, 0, 0);
day2ActualWork.AmountPerHour = Duration.GetInstance(0.75, TimeUnit.Hours);
day2ActualWork.TotalAmount = Duration.GetInstance(6, TimeUnit.Hours);

// Remaining days - 8h/day
var actualWork = new TimephasedWork();
actualWork.Start = new DateTime(2024, 3, 6, 8, 0, 0);
actualWork.Finish = new DateTime(2024, 3, 8, 17, 0, 0);
actualWork.AmountPerHour = Duration.GetInstance(1, TimeUnit.Hours);
actualWork.TotalAmount = Duration.GetInstance(24, TimeUnit.Hours);

var actualRegularWork = assignment.RawTimephasedActualRegularWork;
actualRegularWork.Add(day1ActualWork);
actualRegularWork.Add(day2ActualWork);
actualRegularWork.Add(actualWork);
We're still using multiple TimephasedWork instances to capture the different
rates at which work is being performed, but now these are all added to the
Raw Timephased Actual Regular Work list.
In our final examples, we'll take a quick look at adding non-working periods to the resource assignment, which can be used to create a "split task" in Microsoft Project.
In the code shown below we're using a TimephasedWork instance representing
zero hours of work to explicitly indicate the non-working time. This follows
the same pattern Microsoft Project itself uses:
// Create a resource assignment
ResourceAssignment assignment = task.addResourceAssignment(resource);
assignment.setStart(task.getStart());
assignment.setWork(Duration.getInstance(40, TimeUnit.HOURS));
assignment.setRemainingWork(Duration.getInstance(40, TimeUnit.HOURS));

// This is important - MS Project will accept the timephased data without this,
// but the split won't show up on the Gantt Chart unless this is set
assignment.setWorkContour(WorkContour.CONTOURED);

// Day 1 - 8h
TimephasedWork day1RemainingWork = new TimephasedWork();
day1RemainingWork.setStart(LocalDateTime.of(2024, 3, 4, 8, 0));
day1RemainingWork.setFinish(LocalDateTime.of(2024, 3, 4, 17, 0));
day1RemainingWork.setAmountPerHour(Duration.getInstance(1, TimeUnit.HOURS));
day1RemainingWork.setTotalAmount(Duration.getInstance(8, TimeUnit.HOURS));

// Day 2 - split
TimephasedWork day2RemainingWork = new TimephasedWork();
day2RemainingWork.setStart(LocalDateTime.of(2024, 3, 4, 8, 0));
day2RemainingWork.setFinish(LocalDateTime.of(2024, 3, 4, 17, 0));
day2RemainingWork.setAmountPerHour(Duration.getInstance(0, TimeUnit.HOURS));
day2RemainingWork.setTotalAmount(Duration.getInstance(0, TimeUnit.HOURS));

// Remaining days - 8h/day
TimephasedWork remainingWork = new TimephasedWork();
remainingWork.setStart(LocalDateTime.of(2024, 3, 6, 8, 0));
remainingWork.setFinish(LocalDateTime.of(2024, 3, 11, 17, 0));
remainingWork.setAmountPerHour(Duration.getInstance(1, TimeUnit.HOURS));
remainingWork.setTotalAmount(Duration.getInstance(32, TimeUnit.HOURS));

assignment.getRawTimephasedRemainingRegularWork()
    .addAll(Arrays.asList(day1RemainingWork, day2RemainingWork, remainingWork));
// Create a resource assignment
var assignment = task.AddResourceAssignment(resource);
assignment.Start = task.Start;
assignment.Work = Duration.GetInstance(40, TimeUnit.Hours);
assignment.RemainingWork = Duration.GetInstance(40, TimeUnit.Hours);

// This is important - MS Project will accept the timephased data without this,
// but the split won't show up on the Gantt Chart unless this is set
assignment.WorkContour = WorkContour.Contoured;

// Day 1 - 8h
var day1RemainingWork = new TimephasedWork();
day1RemainingWork.Start = new DateTime(2024, 3, 4, 8, 0, 0);
day1RemainingWork.Finish = new DateTime(2024, 3, 4, 17, 0, 0);
day1RemainingWork.AmountPerHour = Duration.GetInstance(1, TimeUnit.Hours);
day1RemainingWork.TotalAmount = Duration.GetInstance(8, TimeUnit.Hours);

// Day 2 - split
var day2RemainingWork = new TimephasedWork();
day2RemainingWork.Start = new DateTime(2024, 3, 4, 8, 0, 0);
day2RemainingWork.Finish = new DateTime(2024, 3, 4, 17, 0, 0);
day2RemainingWork.AmountPerHour = Duration.GetInstance(0, TimeUnit.Hours);
day2RemainingWork.TotalAmount = Duration.GetInstance(0, TimeUnit.Hours);

// Remaining days - 8h/day
var remainingWork = new TimephasedWork();
remainingWork.Start = new DateTime(2024, 3, 6, 8, 0, 0);
remainingWork.Finish = new DateTime(2024, 3, 11, 17, 0, 0);
remainingWork.AmountPerHour = Duration.GetInstance(1, TimeUnit.Hours);
remainingWork.TotalAmount = Duration.GetInstance(32, TimeUnit.Hours);

var remainingRegularWork = assignment.RawTimephasedRemainingRegularWork;
remainingRegularWork.Add(day1RemainingWork);
remainingRegularWork.Add(day2RemainingWork);
remainingRegularWork.Add(remainingWork);
As the comments in the code indicates, it is important to set the Work Contour
attribute to WorkContour.CONTOURED in order that Microsoft Project
correctly displays the break in working time.
Finally, it is not strictly necessary to include the zero hours TimephasedWork
instance: just leaving a gap between periods of work in the timephased data is
sufficient to achieve the same effect when the result is imported into
Microsoft Project. The code below illustrates this:
// Create a resource assignment
ResourceAssignment assignment = task.addResourceAssignment(resource);
assignment.setStart(task.getStart());
assignment.setWork(Duration.getInstance(40, TimeUnit.HOURS));
assignment.setRemainingWork(Duration.getInstance(40, TimeUnit.HOURS));

// This is important - MS Project will accept the timephased data without this,
// but the split won't show up on the Gantt Chart unless this is set
assignment.setWorkContour(WorkContour.CONTOURED);

// Day 1 - 8h
TimephasedWork day1RemainingWork = new TimephasedWork();
day1RemainingWork.setStart(LocalDateTime.of(2024, 3, 4, 8, 0));
day1RemainingWork.setFinish(LocalDateTime.of(2024, 3, 4, 17, 0));
day1RemainingWork.setAmountPerHour(Duration.getInstance(1, TimeUnit.HOURS));
day1RemainingWork.setTotalAmount(Duration.getInstance(8, TimeUnit.HOURS));

// Day 2 - split

// Remaining days - 8h/day
// Note the gap between the end of the first working day and the start of the next working day.
// This gives us the split.
TimephasedWork remainingWork = new TimephasedWork();
remainingWork.setStart(LocalDateTime.of(2024, 3, 6, 8, 0));
remainingWork.setFinish(LocalDateTime.of(2024, 3, 11, 17, 0));
remainingWork.setAmountPerHour(Duration.getInstance(1, TimeUnit.HOURS));
remainingWork.setTotalAmount(Duration.getInstance(32, TimeUnit.HOURS));

assignment.getRawTimephasedRemainingRegularWork()
    .addAll(Arrays.asList(day1RemainingWork, remainingWork));
// Create a resource assignment
var assignment = task.AddResourceAssignment(resource);
assignment.Start = task.Start;
assignment.Work = Duration.GetInstance(40, TimeUnit.Hours);
assignment.RemainingWork = Duration.GetInstance(40, TimeUnit.Hours);

// This is important - MS Project will accept the timephased data without this,
// but the split won't show up on the Gantt Chart unless this is set
assignment.WorkContour = WorkContour.Contoured;

// Day 1 - 8h
var day1RemainingWork = new TimephasedWork();
day1RemainingWork.Start = new DateTime(2024, 3, 4, 8, 0, 0);
day1RemainingWork.Finish = new DateTime(2024, 3, 4, 17, 0, 0);
day1RemainingWork.AmountPerHour = Duration.GetInstance(1, TimeUnit.Hours);
day1RemainingWork.TotalAmount = Duration.GetInstance(8, TimeUnit.Hours);

// Day 2 - split

// Remaining days - 8h/day
// Note the gap between the end of the first working day and the start of the next working day.
// This gives us the split.
var remainingWork = new TimephasedWork();
remainingWork.Start = new DateTime(2024, 3, 6, 8, 0, 0);
remainingWork.Finish = new DateTime(2024, 3, 11, 17, 0, 0);
remainingWork.AmountPerHour = Duration.GetInstance(1, TimeUnit.Hours);
remainingWork.TotalAmount = Duration.GetInstance(32, TimeUnit.Hours);

var remainingRegularWork = assignment.RawTimephasedRemainingRegularWork;
remainingRegularWork.Add(day1RemainingWork);
remainingRegularWork.Add(remainingWork);
Split Tasks
In previous sections we're touched briefly on the idea of split tasks, where there are one or more periods of non-working time over the duration of a task, which would normally have been expected to be working time. The screenshot below shows a simple example of this:
What's happening here is that the timephased data from any resource assignments is being rolled up to the task level. If there are any gaps in the union of this rolled up timephased data, these are the splits which are illustrated on the Gantt chart as a gap in the bar.
As a convenience MPXJ provides the Task#getWorkSplits method. This returns a
list of LocalDateTimeRange instances representing the contiguous periods of
work for the task. (There is also an equivalent method
ResourceAssignment#getWorkSplits method which summarises the actual and
remaining timephased work into working periods). The screenshot below
illustrates tasks with variety of splits:
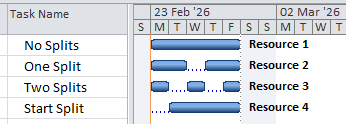
The table below illustrates the result of calling Task#getWorkSplits
for each of these tasks.
| ID | Name | Start | Finish |
|---|---|---|---|
| 1 | No Splits | ||
| 2026-02-23 08:00 | 2026-02-27 17:00 | ||
| 2 | One Split | ||
| 2026-02-23 08:00 | 2026-02-24 17:00 | ||
| 2026-02-26 08:00 | 2026-02-27 17:00 | ||
| 3 | Two Splits | ||
| 2026-02-23 08:00 | 2026-02-23 17:00 | ||
| 2026-02-25 08:00 | 2026-02-25 17:00 | ||
| 2026-02-27 08:00 | 2026-02-27 17:00 | ||
| 4 | Start Split | ||
| 2026-02-24 08:00 | 2026-02-27 17:00 |
As we can see, the task without a split returns a single range. The task
name "Start Split" is interesting as it illustrates that there can be a
non-working period before work actually commences on the task. In this case
Task#getWorkSplits will only return one LocalDateTimeRange instance,
but this range begins after the task's start date.
Primavera P6
Alongside Microsoft Project, Primavera P6 also provides access to timephased data, which can be seen as part of its Resource Assignment view. P6 allows curves to be applied to resource assignments to distribute work or material utilisation in a form other than the default flat distribution. P6 also allows you to modify the timephased view of remaining work or material utilisation to allow you to make your own custom distribution.
MPXJ will read and write timephased data for both XER and PMXML files.
When reading a P6 schedule, the Raw Timephased Actual Regular Work and Raw
Timephased Remaining Regular Work attributes are populated. This data is then
accessible via the following methods on the ResourceAssignment, Resource,
and Task classes:
getTimephasedActualRegularWorkgetTimephasedRemainingRegularWorkgetTimephasedActualWorkgetTimephasedRemainingWorkgetTimephasedWorkgetTimephasedActualRegularCostgetTimephasedRemainingRegularCostgetTimephasedActualCostgetTimephasedRemainingCostgetTimephasedCostgetTimephasedActualMaterialgetTimephasedRemainingMaterialgetTimephasedMaterial
The actual and remaining timephased data retrieved from P6 will be non-overlapping, which is the same as the data retrieved from Microsoft Project: the remaining timephased data should start at a time on or after the actual timephased data finishes.
Primavera P6 also captures an additional set of timephased data which is not
supported by Microsoft Project, which is Planned timephased data
(also referred to in P6 as Budgeted). This data differs from the actual and
remaining timephased data in that it is a single set of data which spans the
entire duration of the ResourceAssignment, rather than being split in the way
that the actual and remaining data is.
The Raw Timephased Planned Work attribute is populated with the original data
from the P6 schedule. This data is then accessible via the following methods on
the ResourceAssignment, Resource, and Task classes:
getTimephasedPlannedWorkgetTimephasedPlannedCostgetTimephasedPlannedMaterial
P6 does not store timephased data for resource assignments which use a flat distribution of work or material utilisation. Instead timephased data is only stored where a curve has been applied, or manual edits have been made to the distribution.
For resource assignments which have a flat distribution of work or material
utilisation, the raw timephased data lists will be empty. Timephased data is
still available via MPXJ as the library will generate the appropriate
distribution dynamically when any of the getTimephased methods is called.